

Rendering Attributed Strings in SwiftUI
In this post, we will bring a UIKit based view into SwiftUI to display attributed strings. We will see how to make our view automatically adjust its height to the text contents and react to SwiftUI environment changes.
Although you can combine different Text views to display formatted text in SwiftUI, there are still some things that we can only do by using attributed strings: links, paragraph styles, or attachments, to name a few.
Wrapping UITextView
We will start by implementing a simple wrapper around UITextView. SwiftUI provides the UIViewRepresentable protocol to bring any UIKit based view into a SwiftUI view tree. It requires implementing two methods, one for creating the UIKit view and one for updating it.
struct TextViewWrapper: UIViewRepresentable {
    var attributedText: NSAttributedString

    func makeUIView(context: Context) -> UITextView {
        let uiView = UITextView()

        uiView.backgroundColor = .clear
        uiView.textContainerInset = .zero
        uiView.isEditable = false
        uiView.isScrollEnabled = false
        uiView.textContainer.lineFragmentPadding = 0

        return uiView
    }

    func updateUIView(_ uiView: UITextView, context: Context) {
        uiView.attributedText = attributedText
    }
}
Let’s give TextViewWrapper a try:
struct ContentView: View {
    var body: some View {
        TextViewWrapper(
            attributedText: NSAttributedString(
                string: "Hello, world!",
                attributes: [
                    .font: UIFont.preferredFont(forTextStyle: .body),
                    .backgroundColor: UIColor.yellow
                ]
            )
        )
    }
}
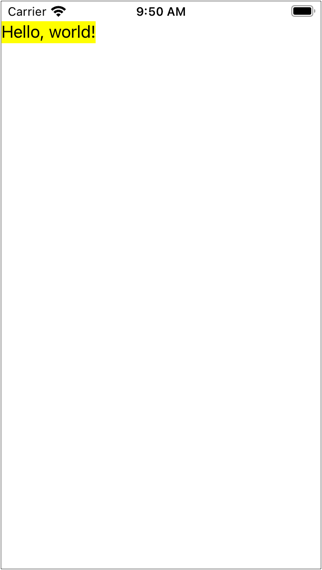
There is no documentation about it, but it looks like UIViewRepresentable views are layout neutral, taking up all available space.
Here is what happens when we try it with a longer text:
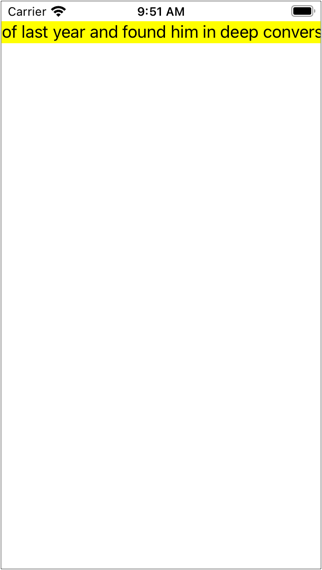
It seems that SwiftUI somehow considers the intrinsicContentSize of the UITextView, which is why the text appears on a single line.
Let’s tackle these issues one at a time, starting with breaking the text into multiple lines when it does not fit the container.
Multiline Text
To break the text into multiple lines, we need to override UITextView’s intrinsicContentSize property to return the text’s ideal size, given a maximum layout width.
We will start by creating a UITextView subclass that does precisely that:
final class TextView: UITextView {
    var maxLayoutWidth: CGFloat = 0 {
        didSet {
            guard maxLayoutWidth != oldValue else { return }
            invalidateIntrinsicContentSize()
        }
    }

    override var intrinsicContentSize: CGSize {
        guard maxLayoutWidth > 0 else {
            return super.intrinsicContentSize
        }

        return sizeThatFits(
            CGSize(width: maxLayoutWidth, height: .greatestFiniteMagnitude)
        )
    }
}
We have added a property to set the maximum layout width and overridden intrinsicContentSize to calculate the ideal size using that value.
With this in place, let’s update the implementation of TextViewWrapper:
struct TextViewWrapper: UIViewRepresentable {
    var attributedText: NSAttributedString
    var maxLayoutWidth: CGFloat

    func makeUIView(context: Context) -> TextView {
        let uiView = TextView()

        uiView.backgroundColor = .clear
        uiView.textContainerInset = .zero
        uiView.isEditable = false
        uiView.isScrollEnabled = false
        uiView.textContainer.lineFragmentPadding = 0

        return uiView
    }

    func updateUIView(_ uiView: TextView, context: Context) {
        uiView.attributedText = attributedText
        uiView.maxLayoutWidth = maxLayoutWidth
    }
}
Notice that we are returning an instance of TextView, not UITextView. We are also setting maxLayoutWidth, together with attributedText, when updating the current TextView instance.
Using a GeometryReader
We are going to use a GeometryReader to obtain the maximum layout width. A GeometryReader is a container view that lets us read the parent’s size during a layout operation.
GeometryReader encapsulates the size of the container view and the safe area insets in a GeometryProxy struct. Let’s implement a simple extension to calculate the maximum width:
extension GeometryProxy {
    var maxWidth: CGFloat {
        size.width - safeAreaInsets.leading - safeAreaInsets.trailing
    }
}
Now we will create an AttributedText view to put it all together and see how it looks:
struct AttributedText: View {
    private let attributedText: NSAttributedString

    init(_ attributedText: NSAttributedString) {
        self.attributedText = attributedText
    }

    var body: some View {
        GeometryReader { geometry in
            TextViewWrapper(
                attributedText: attributedText,
                maxLayoutWidth: geometry.maxWidth
            )
        }
    }
}

struct AttributedText_Previews: PreviewProvider {
    static var previews: some View {
        AttributedText(
            NSAttributedString(
                string: "I had called upon my friend, ...",
                attributes: [
                    .font: UIFont.preferredFont(forTextStyle: .body),
                    .backgroundColor: UIColor.yellow
                ]
            )
        )
    }
}

Great! Now the text breaks into multiple lines. It looks like we are going in the right direction.
We still have a tricky task ahead of us, make the final view adjust its height to the text contents.
Fixing the Height
Let’s make the first attempt to fix the height of the view to the text contents. It’s going to fail, but we will learn something along the way.
We can use a @State property to manage the text height and pass a binding of it to TextViewWrapper to update the value after updating the view.
First of all, we add a @State property to the AttributedText view:
struct AttributedText: View {
    @State private var height: CGFloat?
    private let attributedText: NSAttributedString

    init(_ attributedText: NSAttributedString) {
        self.attributedText = attributedText
    }

    var body: some View {
        GeometryReader { geometry in
            TextViewWrapper(
                attributedText: attributedText,
                maxLayoutWidth: geometry.maxWidth,
                height: $height
            )
        }
        .frame(height: height)
    }
}
Notice that we are passing a binding of the height property to TextViewWrapper and that we are using its value to fix the height with the frame(width:height:alignment:) modifier.
The implementation of TextViewWrapper could be as follows:
struct TextViewWrapper: UIViewRepresentable {
    var attributedText: NSAttributedString
    var maxLayoutWidth: CGFloat
    @Binding var height: CGFloat?

    func makeUIView(context: Context) -> TextView {
        // ...
    }

    func updateUIView(_ uiView: TextView, context: Context) {
        uiView.attributedText = attributedText
        uiView.maxLayoutWidth = maxLayoutWidth

        height = uiView.intrinsicContentSize.height
    }
}
However, there is a problem with this code. If you run it, you will get the following message in the console:
[SwiftUI] Modifying state during view update, this will cause undefined behavior.
Indeed, modifying the height binding inside updateUIView(_:context:) is the same as changing the height state directly inside a view’s body, rather than from an external event. SwiftUI does not allow it.
You may be tempted to take the usual escape hatch and do this:
func updateUIView(_ uiView: TextView, context: Context) {
    uiView.attributedText = attributedText
    uiView.maxLayoutWidth = maxLayoutWidth

    DispatchQueue.main.async {
        height = uiView.intrinsicContentSize.height
    }
}

Although this works in appearance, it could inadvertently cause issues in the future. For starters, SwiftUI previews don’t show AttributedText with the proper height, unless you press the Live Preview button.
Let’s try a different approach. Instead of directly modifying a state variable, we will use an observable object whose state is the text’s current height.
final class TextViewStore: ObservableObject {
    @Published private(set) var height: CGFloat?

    func didUpdateTextView(_ textView: TextView) {
        height = textView.intrinsicContentSize.height
    }
}
Now we can replace the state property in AttributedText with a @StateObject property that instantiates a TextViewStore.
struct AttributedText: View {
    @StateObject private var textViewStore = TextViewStore()
    private let attributedText: NSAttributedString

    init(_ attributedText: NSAttributedString) {
        self.attributedText = attributedText
    }

    var body: some View {
        GeometryReader { geometry in
            TextViewWrapper(
                attributedText: attributedText,
                maxLayoutWidth: geometry.maxWidth,
                textViewStore: textViewStore
            )
        }
        .frame(height: textViewStore.height)
    }
}
Notice that we are passing the TextViewStore instance to TextViewWrapper and that we are using its height property to fix the height with the frame(width:height:alignment:) modifier.
Now we need TextViewWrapper to call didUpdateTextView(_:) on the textViewStore after updating the text view.
struct TextViewWrapper: UIViewRepresentable {
    var attributedText: NSAttributedString
    var maxLayoutWidth: CGFloat
    var textViewStore: TextViewStore

    func makeUIView(context: Context) -> TextView {
        // ...
    }

    func updateUIView(_ uiView: TextView, context: Context) {
        uiView.attributedText = attributedText
        uiView.maxLayoutWidth = maxLayoutWidth

        textViewStore.didUpdateTextView(uiView)
    }
}
Give it a try, and you’ll see that it works flawlessly. Even SwiftUI previews will now show AttributedText with the proper height.

Reacting to the Environment
Since AttributedText displays text, it would be nice to make it aware of the current line limit and truncation mode. In SwiftUI, you can change these values using the corresponding view modifier.
AttributedText(
    NSAttributedString(
        string: "I had called upon my friend, ...",
        attributes: [
            .font: UIFont.preferredFont(forTextStyle: .body),
            .backgroundColor: UIColor.yellow
        ]
    )
)
.lineLimit(2)
.truncationMode(.middle)
Internally, these modifiers change some value of the environment. We need to make TextView aware of those environment values.
struct TextViewWrapper: UIViewRepresentable {

    // ...

    func updateUIView(_ uiView: TextView, context: Context) {
        uiView.attributedText = attributedText
        uiView.maxLayoutWidth = maxLayoutWidth

        uiView.textContainer.maximumNumberOfLines = context.environment.lineLimit ?? 0
        uiView.textContainer.lineBreakMode = NSLineBreakMode(context.environment.truncationMode)

        textViewStore.didUpdateTextView(uiView)
    }
}

extension NSLineBreakMode {
    init(_ truncationMode: Text.TruncationMode) {
        switch truncationMode {
        case .head:
            self = .byTruncatingHead
        case .tail:
            self = .byTruncatingTail
        case .middle:
            self = .byTruncatingMiddle
        @unknown default:
            self = .byWordWrapping
        }
    }
}
Notice that we update the view’s text container maximumNumberOfLines and lineBreakMode with the context.environment values. We also added an extension to map TruncationMode to NSLineBreakMode.
Now, if we change the line limit or the truncation mode, AttributedText will react appropriately.

Conclusion
We had to overcome some obstacles to fix the height of the view to the text contents. It seems that UIViewRepresentable is more intended to integrate full screen or layout neutral views rather than atomic components like text. Hopefully, the next SwiftUI release will improve this situation and let us tap into the layout system for better integration.
You can find the code for this post here:
https://github.com/gonzalezreal/AttributedText
To see a practical use of AttributedText, check out this other Swift package to render markdown in SwiftUI:
https://github.com/gonzalezreal/MarkdownUI
I hope you find this post useful. If you have any questions or comments, feel free to reach out on Twitter.